I've had a lot of fun doing construction projects this year and I thought I would finish up by designing a countdown to Christmas calendar for my niece and her family.
It's the North Pole, complete with buildings and snow and reindeer and of course, Santa. There are places for treats and a hanging sign to display the number of days until Christmas.
It's a fairly large project - the base is a 16" square of 1/2" foam core board. Each side has different buildings all constructed out of chipboard and all have interactive elements - some have treats and some open to show a Christmas character.I will put together into a separate post.
The buildings are basically boxes with holes cut out for the treat windows/doors. There are floors inside the buildings to support the treat drawers. I took some photos as I built the project which
The main paper line used was Bo Bunny's Elf Magic.
I supplemented the Bo Bunny paper with other colorful Christmas paper from various other collections - American Crafts, Creative Imaginations and Bella Blvd.
We were fortunate to have a nice stamping and scrapbooking show here last month (Tim Holtz even came!!) and I found lots of paper and supplies there.
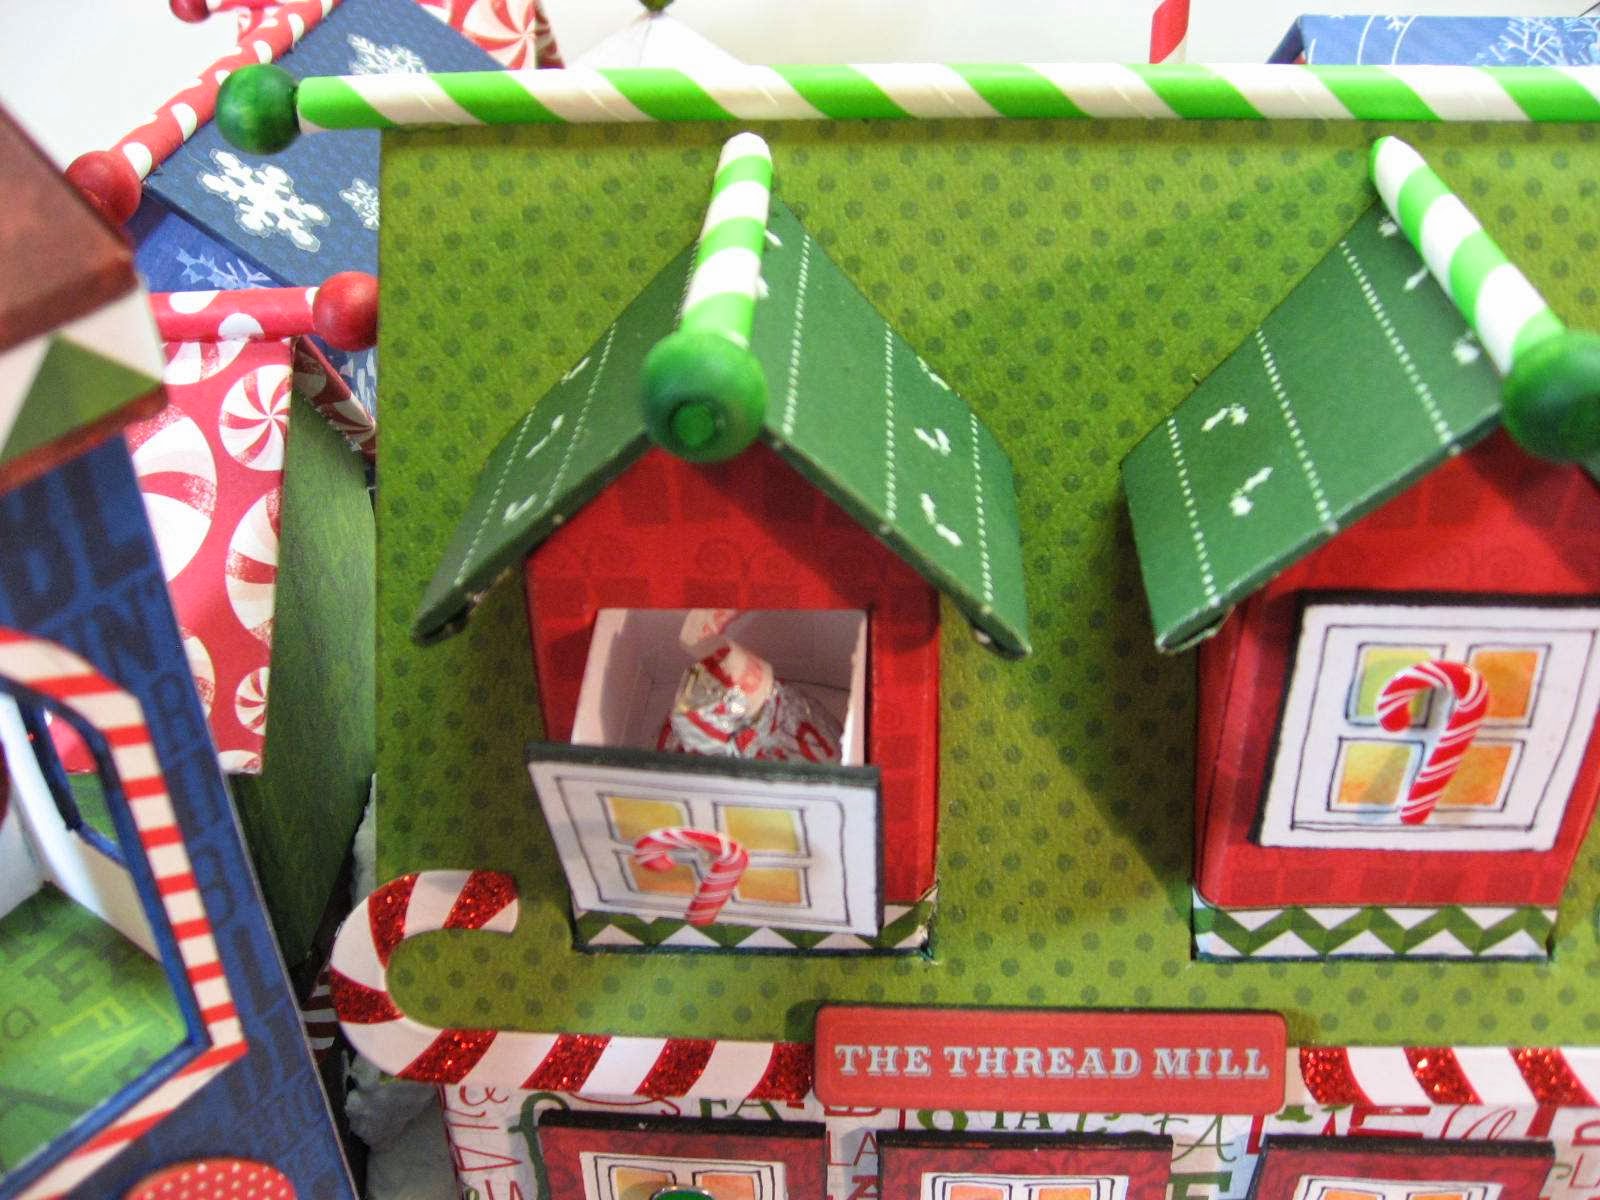
Each window or door that has a brad is actually a little drawer that holds a small treat.
In the "bird's eye" view below you can see how all the buildings come together around the central square.
The square has styrofoam carved to give it some dimension and then covered with Golden Light Molding Paste.
The North Pole is a sturdy skewer covered in a paper straw that fits into a wood wheel under the snow. It can be removed to make the project easier to store.
From the sign dangles a disc with the number of days until Christmas.
...and now for some closeups
The Bo Bunny paper had some great chipboard stickers - several with building names, so this main building is "The Thread Mill". It has eight places for treats behind it's windows and door. All the little brads - mittens, candy canes and gingerbread folks came from Eyelet Outlet. I've had the silver snowflake brads for so long I can't remember who makes them. I added some candy cane chipboard stickers from Mambi Chips.
The Bell Tower has a large glittered jingle bell for the bell. I just love that!
This building has the only removable roof - the last treat is hiding in there. The windows were cut with Tim Holtz Arch Frame die.
Some more of the Elf Magic chipboard elements decorate the tower and a "Santa's Village" sign completes the building.
Little Gingerbread folks decorate the windows on the "North Pole Bakery". This building has a little front porch added on. That wasn't too tricky except for the size of the pieces making it a little difficult.
The door (in fact all the treat doors) has a little magnet to hold it closed since the treat drawer is attached only at the top of the door.
At the side of the bakery is a large chipboard tree from the paper line that I "planted" in a small wooden flower pot.
I curved the edges of the roof up by making some shallow cuts in the chipboard and then rolling them up. I used a continuous sheet of paper when covering this roof so I could more easily encourage the curve to stay in place.
The barn door is attached to a drawer that holds all the countdown discs. The door is topped with one of the pediments from TH Pediment dies.
Here's a closeup of the top of the North Pole sign which shows the countdown disc - 25. I made these discs by first cutting a Tim Holtz Mini Bottle Cap die out of TH Grunge Paper and painting it red with Festive Berries Distress Paint. I then attached Maya Road numbers to both sides. I added a jump ring so it can be hung from the hook on the sign.
On either side of the barn are doors for Santa and Rudolph. Here's Santa peaking out. These doors as well as the Reindeer Barn doors are all made the same way. The image behind the chipboard door is glued to the flat front of the building. A strip of Tyvek is used for the hinge by attaching it behind the image and to the inside of the door. A couple of magnets hidden beneath the image and on the back side of the door keep the door shut. It's more of a layering detail than a complicated construction detail.
Here's the Reindeer Barn with one of the doors open...let's see, it's Vixen. All the eight reindeer plus Rudolph have their own private entries. The reindeer are cut from decorative paper using several Tim Holtz reindeer dies. All of the doors have EK Success Postage Stamp stickers and a name plate printed out on the computer.
Here is a closeup of the front door to "Santa's Home". If you open the door there's a little elf peeping out.
The wreaths are Prima Wood Embellishments colored with Distress Markers and then glittered using Glossy Accents and Distress Glitter. Yes, I allowed glitter into the house finally.
You can catch a glimpse of two Graphic 45 Drawer Pulls used as canopies on the two sides of Santa's House.
Here's a closeup of one of the treat drawers pulled partially out. I had a "make it work" moment with these drawers...when they have a treat in them there is no problem, the treat is heavy enough to hold the drawer level. But because the openings are slightly bigger than the drawers and there is no "floor" above the drawers, they tended to tip out slightly once they were empty. I solved this problem by adding a 7/8" fender washer to the bottom of each drawer and covering that with paper.
I really enjoyed designing and creating this project. It was a lot of fun to figure out how to make each building and give it unique features and make everything fit together. And then embellishing with all the little decorations to choose from was so much fun.
I made a video to give you a 360 view of the project...


5 comments:
So colorful, so detailed, fantastic. I don't see any attributions so this must be YOUR OWN DESIGN from start to finish which is just awesome. I particularly like the door knobs and the window hangings and the bell tower with the bell ornament and the fancy scroll work is so fun. What a end-of-year project indeed!
Thank you so much Linda. Yes, this is my own design - it was a lot of fun to create.
Truly a work of art. Love and thanks for explaining things so a novice like me can learn!
Relay cool house, excellent work on the craftsmanship :) love KS
Enjoyed looking at this, very good stuff, thank you.
Post a Comment